Data entry form: Things to know
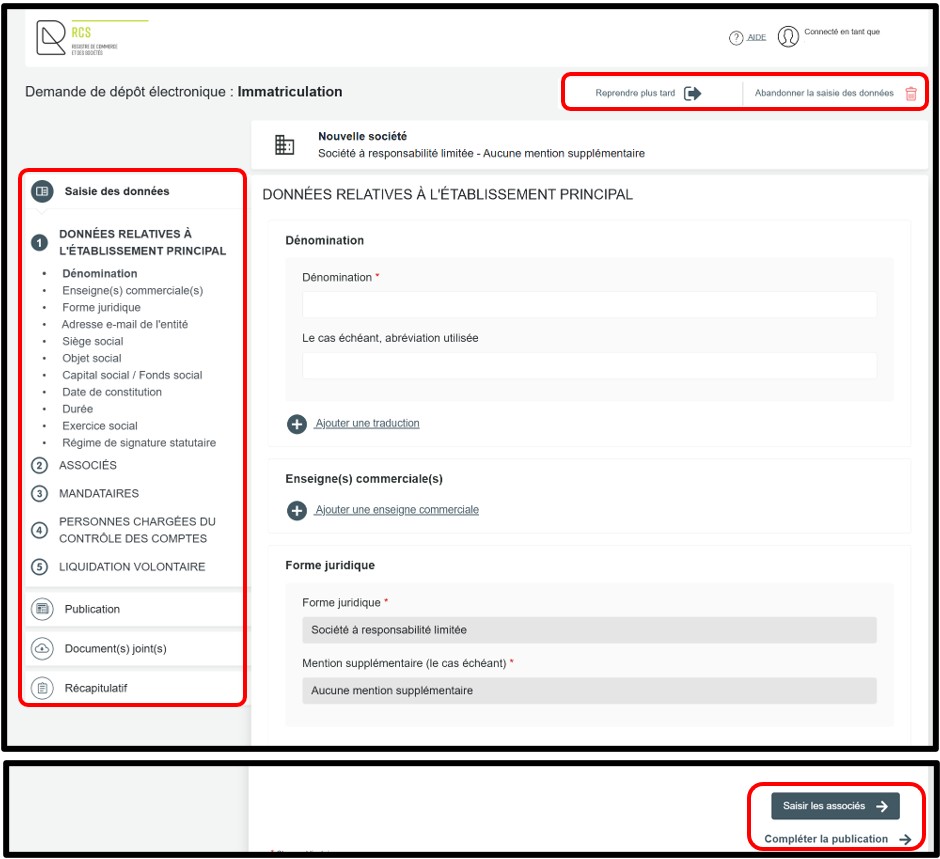
The registration request combines in a structured way all the information required to be communicated to the RCS, in accordance with the modified law of 19 December 2002.
Depending on the legal form selected, the registration request is structured in sections and sub-sections with fields to be completed to facilitate the collection of information in
accordance with current legal requirements.
The user will also find help in the form of explanations or tooltips that can be consulted, providing additional explanations for the correct and compliant entry of the required data.
Positioned at the top right of the registration request, the following functionalities are accessible to the user:
- Button Reprendre plus tard:
Allows the user to save and resume data entry at a later stage.
The registration request is saved in the My requests to be finalised section, which can be accessed in the user's customer space via the My Account menu.
- Button Abandonner la saisie :
Allows the user to permanently delete the administrative request in process.
- The Navigation Menu, located to the left of the registration request, groups together the main sections for which the user is invited to enter data / upload the requested documents.
- Navigation buttons, located at the bottom of the registration request, allow the user to navigate between the different sections and sub-sections of the filing request.
Section "Saisie des données"
Section of the registration request form containing the sub-sections relating to the data to be entered and the respective fields to be completed.
Input fields
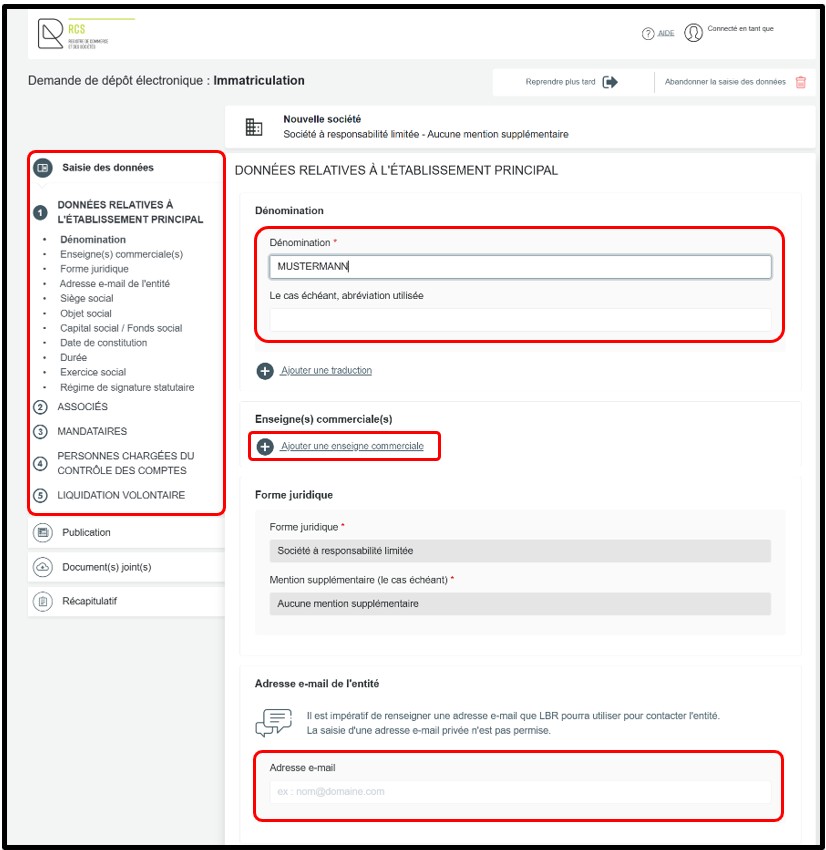
The input fields are self-adjusting. The size of the field is automatically adjusted to the content until the maximum authorized size is reached. All fields can only accept a limited number of characters, including self-adjusting fields.
The user is prompted to click in the fields to activate the cursor and enable data entry.
Depending on their needs, users can add additional fields. For example, to enter a commercial name, the user has to click on the Add commercial name button to add the field and enter the data.
Calendar field
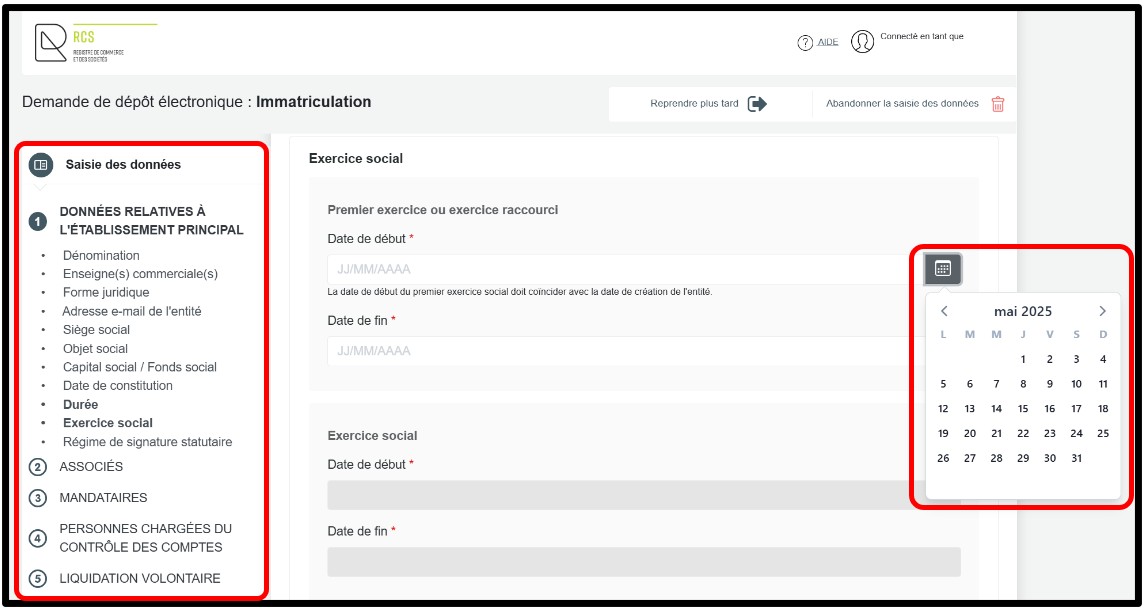
The input field circled in red is a context-sensitive calendar that allows the user to select a date using a visual selector.
To display the calendar, the user has to click on the calendar icon, which automatically brings up a small interactive calendar to the right of the field concerned. The user can then navigate between months and click on the desired date.
Functionality:
- Allows the user to select a date without having to enter it manually.
- This reduces input errors (e.g. invalid format) and ensures data consistency.
Drop-down list field
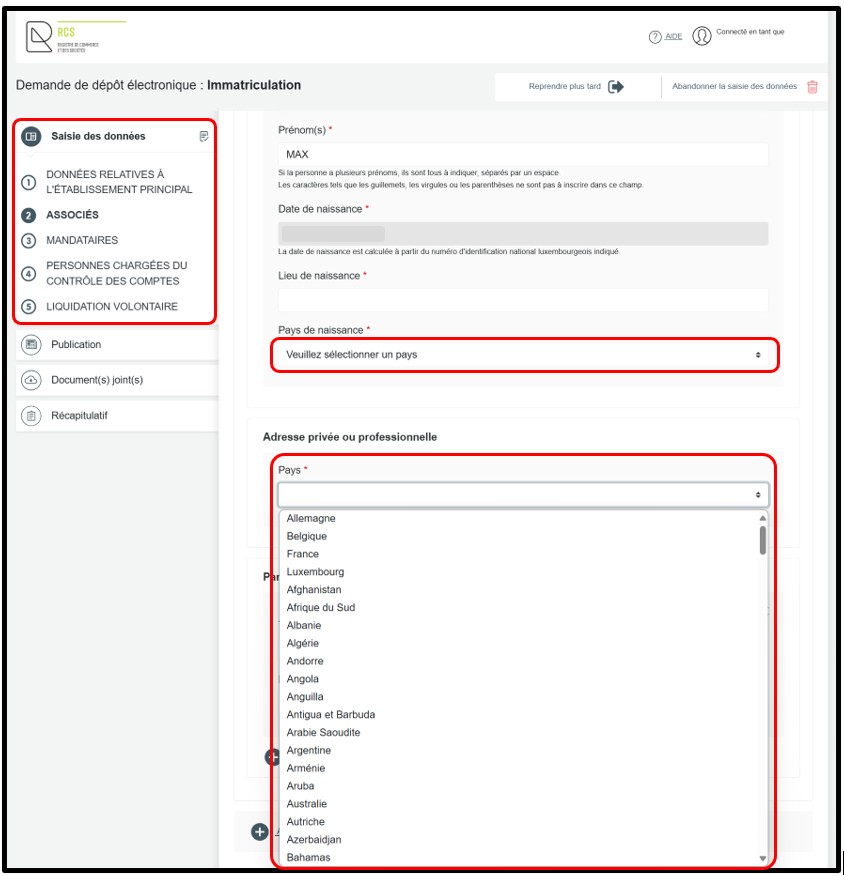
The input field circled in red is a drop-down list (or drop-down menu) allowing the user to select from values offered in a predefined list.
To display the list, the user has to click on the arrow to the right of the field. The user then has to scroll down the list and select the appropriate value.
Once the list is displayed, typing a letter immediately positions the cursor on the first value that begins with that letter. Repeating the same letter positions the cursor on the following values.
Functionality:
- Allows the user to choose a value without having to enter it manually, by selecting an option from a predefined list.
- This collapses input errors (e.g. spelling mistakes, non-standard names) and ensures data consistency, particularly for information related to nationality or address.
Control mechanisms
When the user navigates from one section of the form to another or from one step of their request to another, automatic checks are performed.
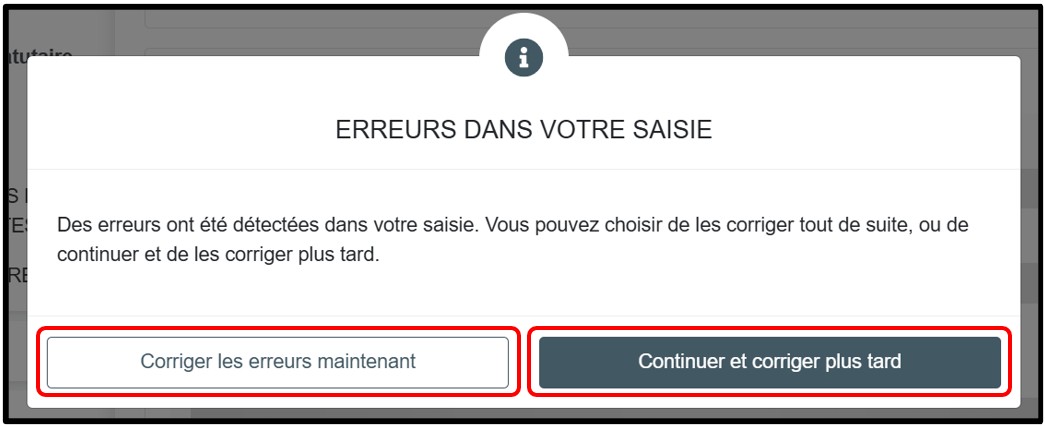
In the event of errors in data entry, the user is informed by a pop-up window entitled Errors in your entry which appears automatically when errors are detected in the form. The incorrect fields are highlighted in red within the form.
The user then has to click on one of the two buttons available:
- Correct errors now will redirect the user to the section or sub-section containing the errors to be corrected
- Continue and correct later allows the user to move on to the next section and continue entering data in the form
Functionality:
- Allows flexible error management: immediate correction for rigorous processing or deferred correction so as not to interrupt the process in progress.
Choosing the type of person
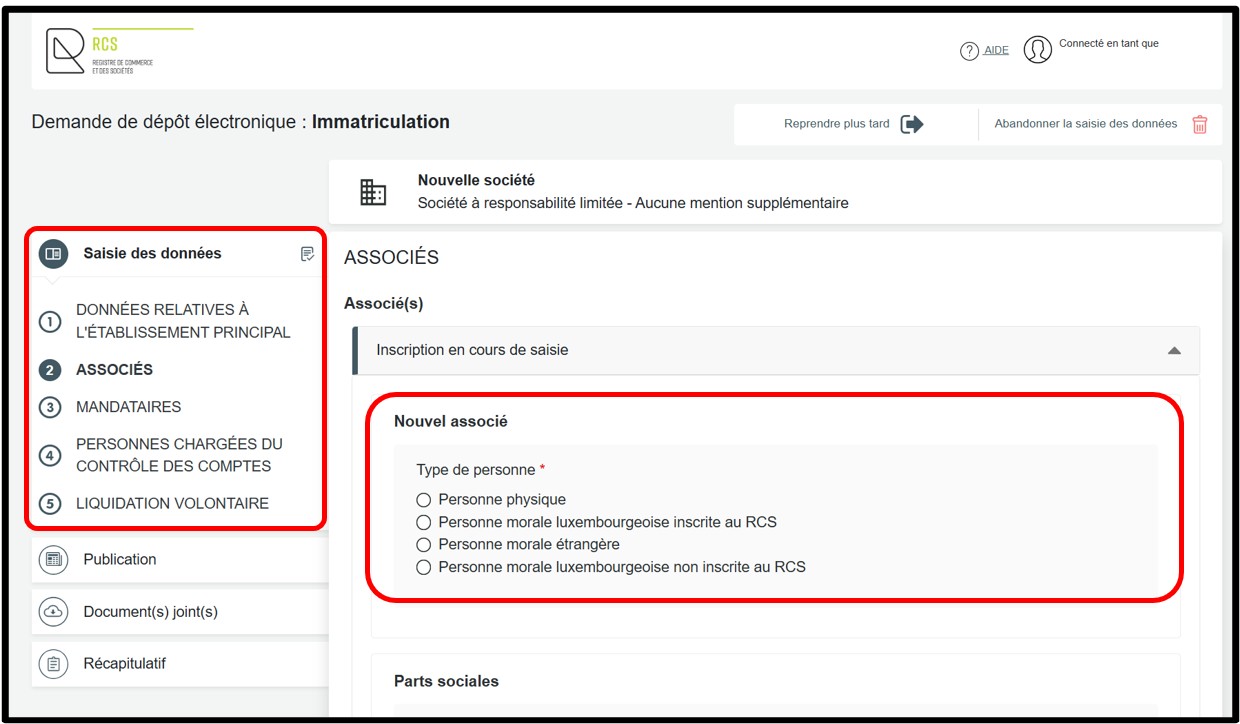
As the data to be entered differs depending on whether the person is a natural person or a Luxembourg or foreign legal entity, the user has to select a type of person before being able to register a new person.
To make a selection, the user has to click on one of the circles corresponding to one of the options offered. Only one selection can be made at a time.
The selection displays only the input fields for the selected person type.
Natural person
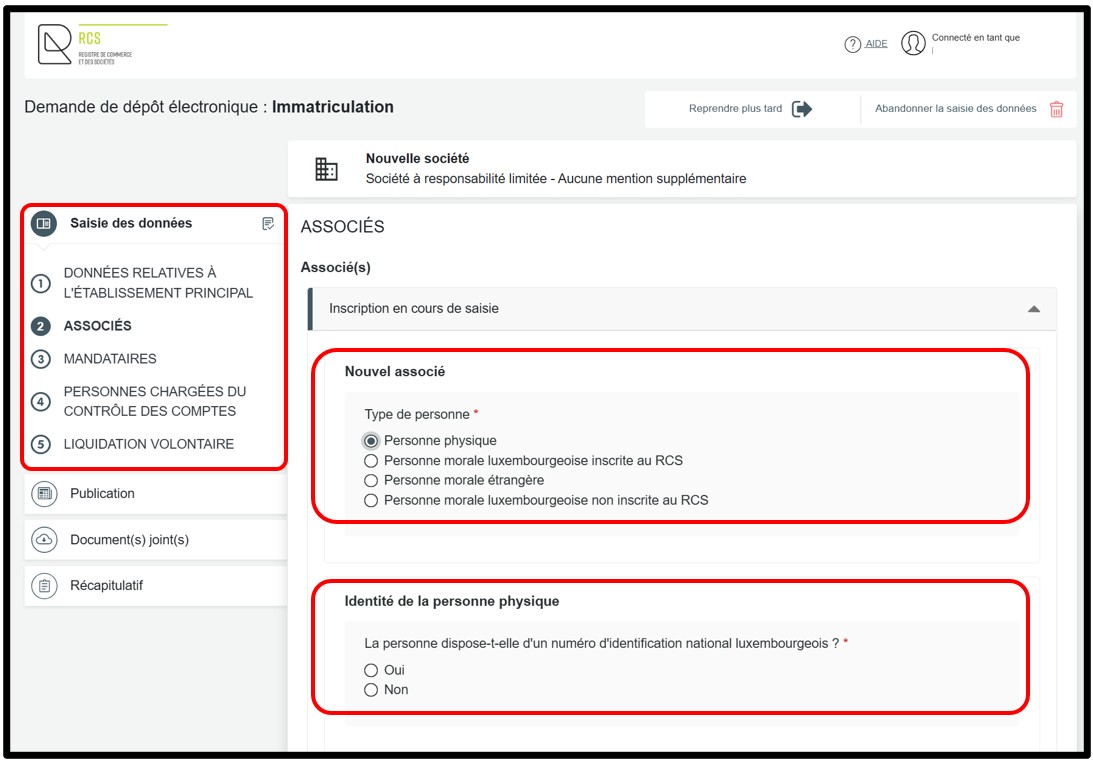
By selecting the option Natural person, the user must first specify whether the person concerned has a Luxembourg national identification number.
Depending on the answer given, the appropriate fields will automatically appear on the page, and the user will have to enter the required information.
Luxembourg legal entity registered with the RCS
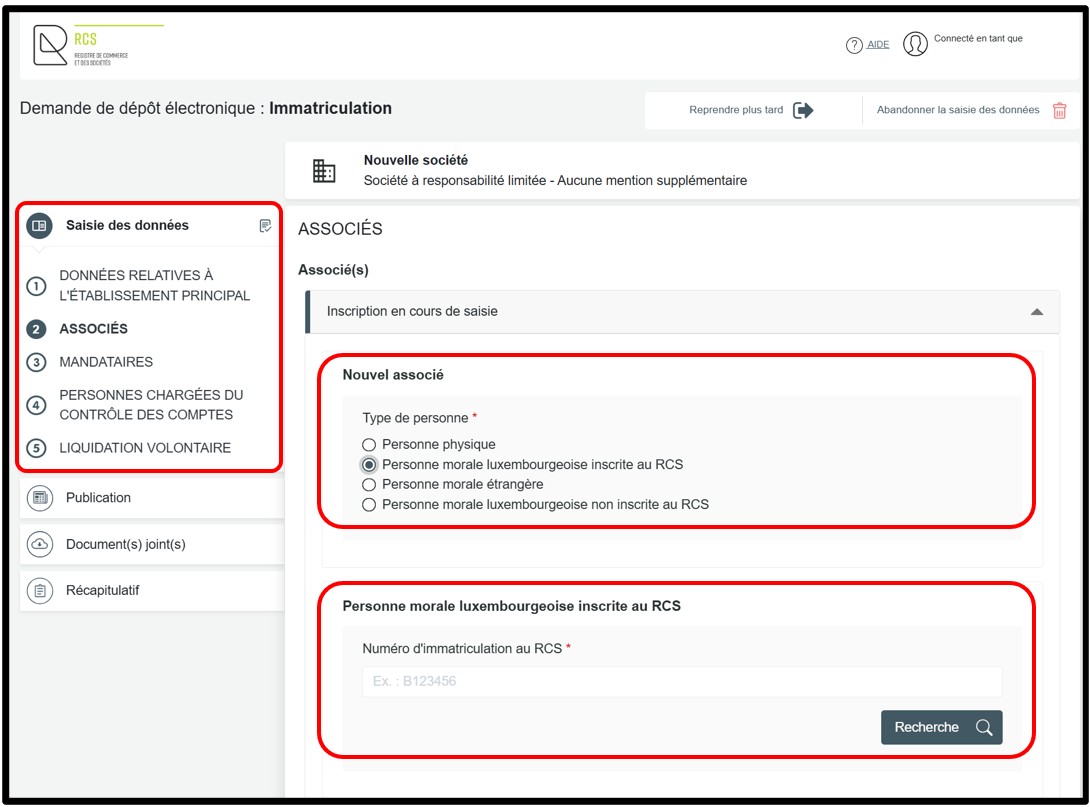
By selecting the option Luxembourg legal entity registered with the RCS, the user activates a search function for entering the RCS registration number of the Luxembourg legal entity already registered.
After entering the RCS number, the user has to click on the Search button to automatically display the data entered in the file of the Luxembourg legal entity concerned.
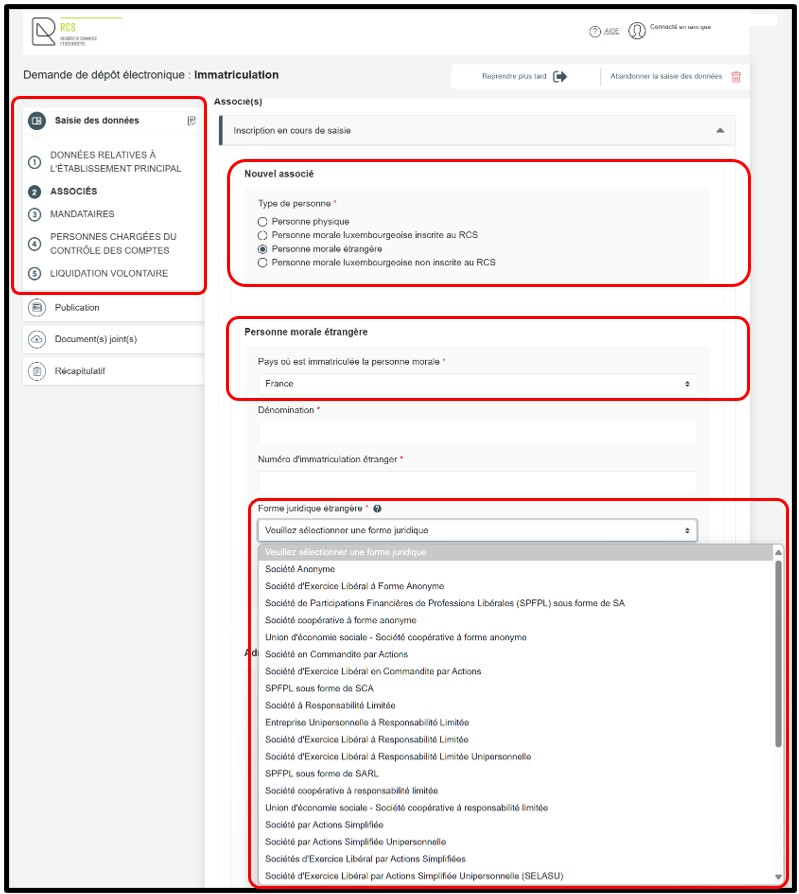
Foreign legal entity
By selecting the Foreign legal entity option, the user triggers the display of specific input fields allowing them to enter the required information concerning the foreign legal entity.
Depending on the country selected, the user will view drop-down lists in the Foreign legal form and Foreign register name fields, adapted to foreign structures and the specific characteristics of the country entered.
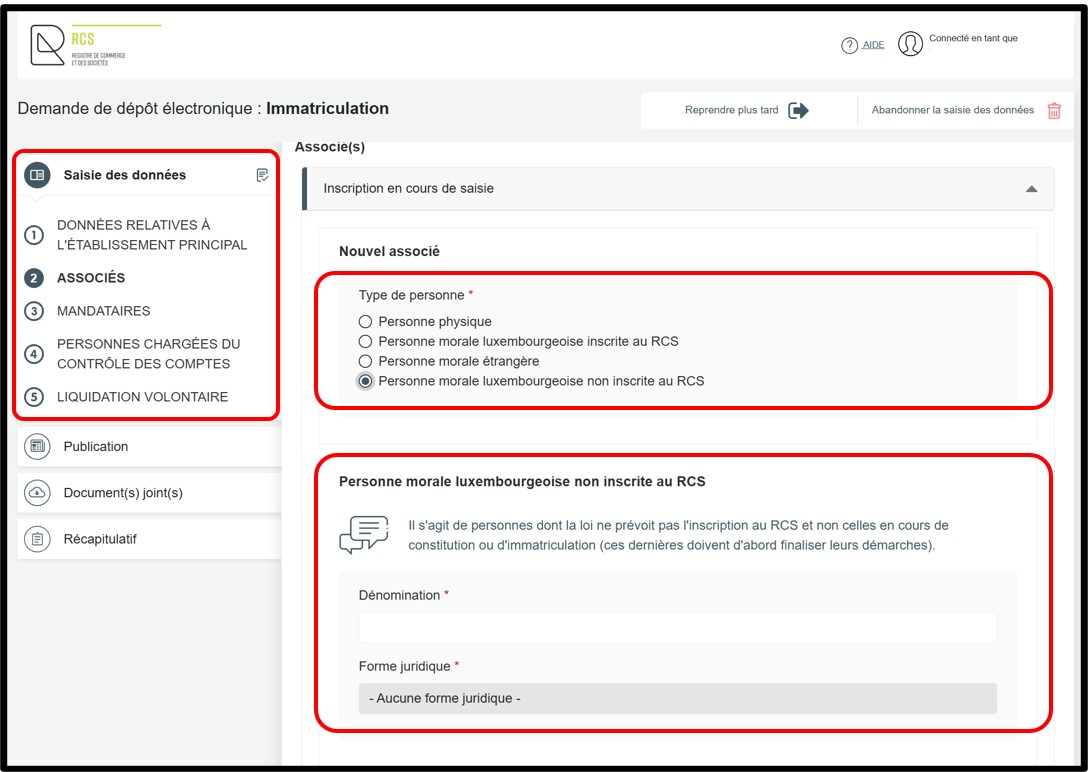
Luxembourg legal entity not registered with the RCS
By selecting the option Luxembourg legal entity not registered with the RCS, the user triggers the display of specific input fields allowing them to enter the information required concerning the Luxembourg legal entity not registered with the RCS.
To continue with the filing request, the user must then click on the Compléter la publication (Complete publication) button.
Section "Publication"
Section of the registration request where the user is asked to upload the documents for publication, which will be published in the RESA. The document to be attached must be a PDF file that complies with the PDF/A text standard.
The type of publication depends on the type of filing and the legal form of the entity concerned by the filing.
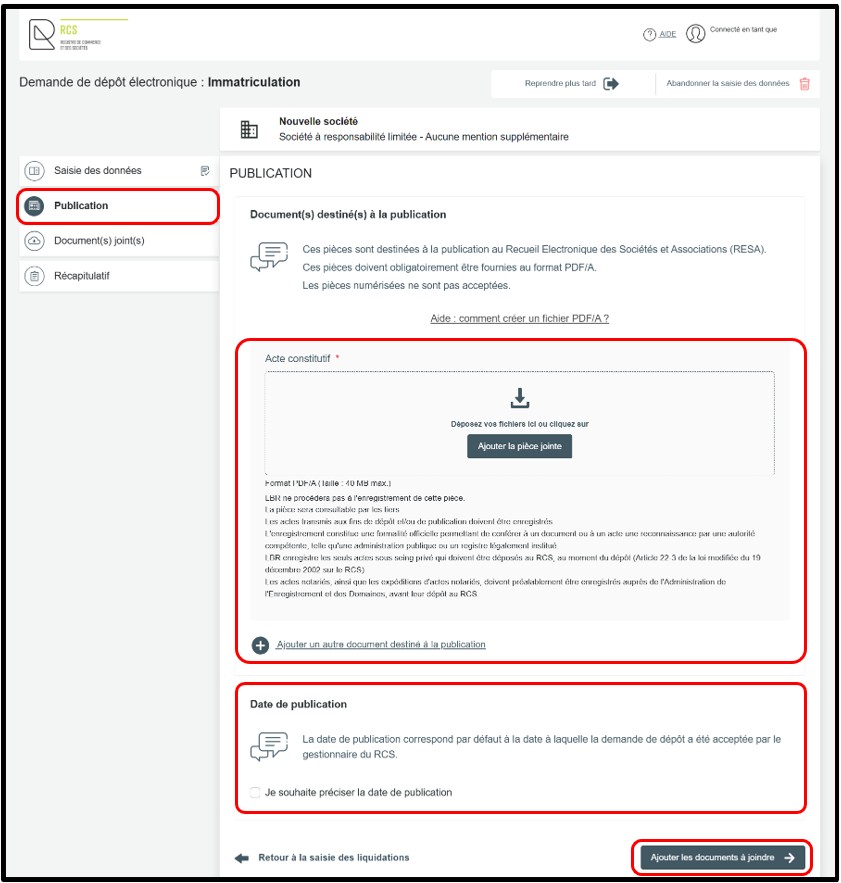
The type of publication depends on the type of filing and the legal form of the entity concerned by the filing.
The document intended for publication must be attached by the user in the Document(s) destiné(s) à la publication (Document(s) intended for publication) field by clicking on the Ajouter la pièce jointe (Add attachment) button. The upload operation may take some time as each file attached to the registration request is verified to ensure compliance with the PDF/A standard.
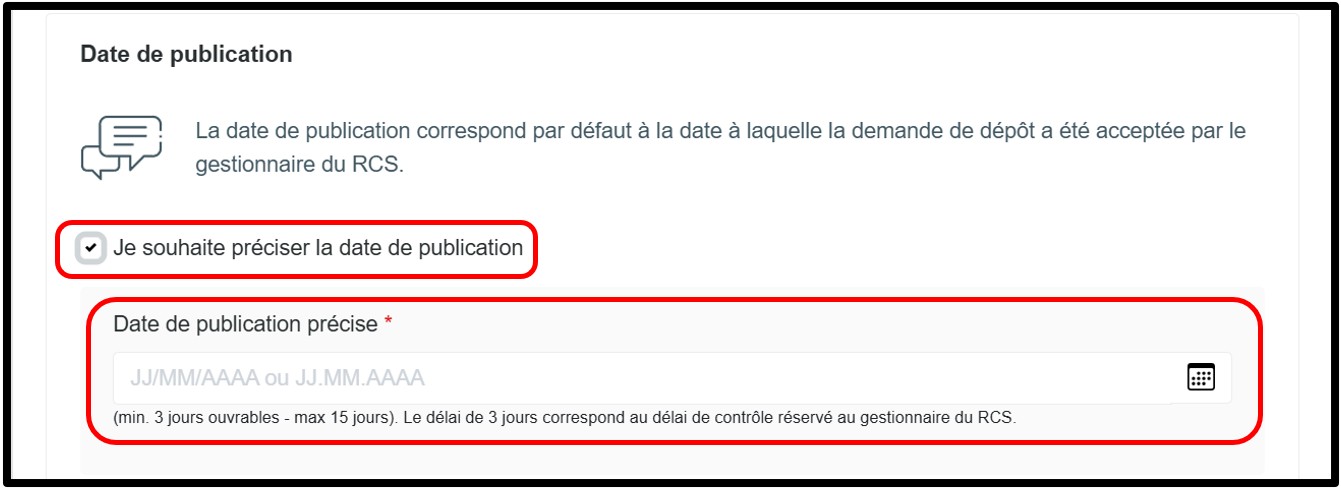
Field Date de publication (Date of publication)
The date of publication is, by default, the date on which the registration request was accepted by LBR.
However, the user can choose a specific date for the publication of their document by checking the box Je souhaite préciser la date de publication (I wish to specify the date of publication). In order to specify a publication date, the user can use the contextuel calendar option to select a date using a visual selector.
To continue with the filing request, the user must then click on the Ajouter les documents à joindre (Add documents to be attached) button.
Section "Document(s) joint(s)"
Section of the registration request where the user is asked to upload the documents required to validate the request.
The list of documents to attach depends on the type of filing and the legal form of the entity concerned by the filing.
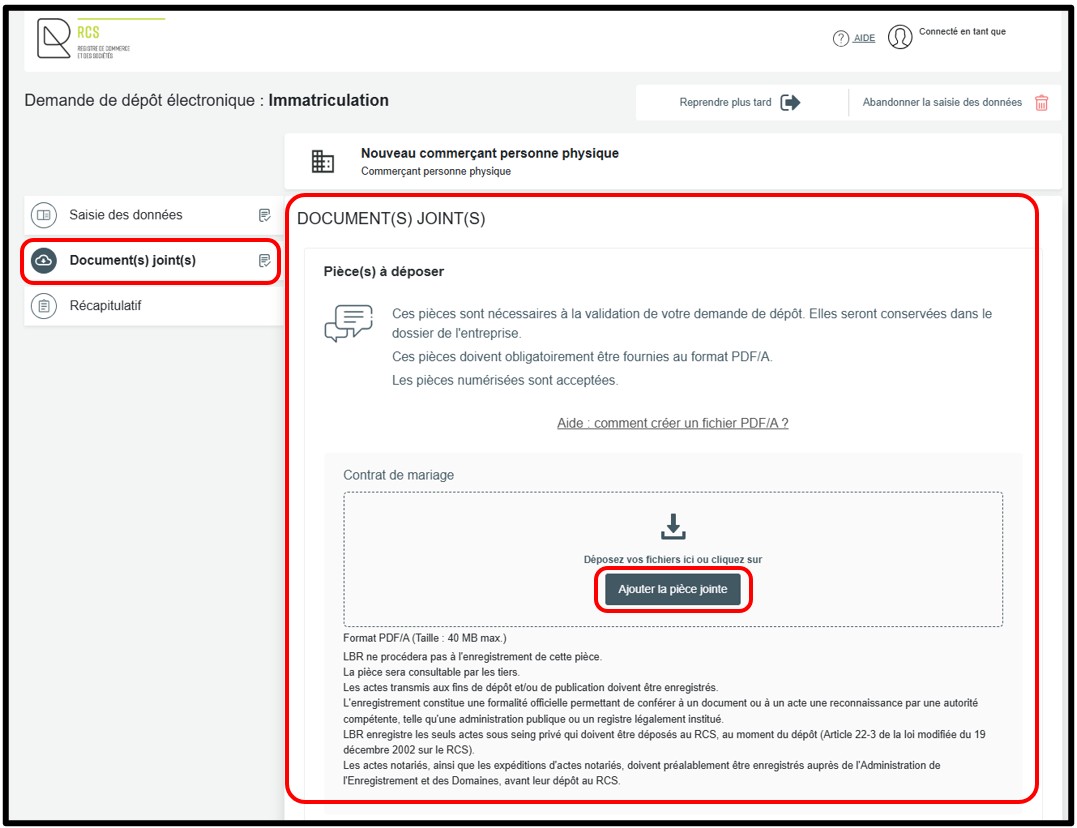
Document(s) to attach for validation purposes
The section Document(s) joint(s) (Attached document(s)) may, if necessary, provide the user with a list of mandatory documents to be submitted for the purpose of validating the registration request.
In this case, the user must attach the document(s) in PDF/A format required to validate their filing request in the Pièce(s) à déposer (Document(s) to be filed) field by clicking on the Ajouter la pièce jointe (Add attachment) button.
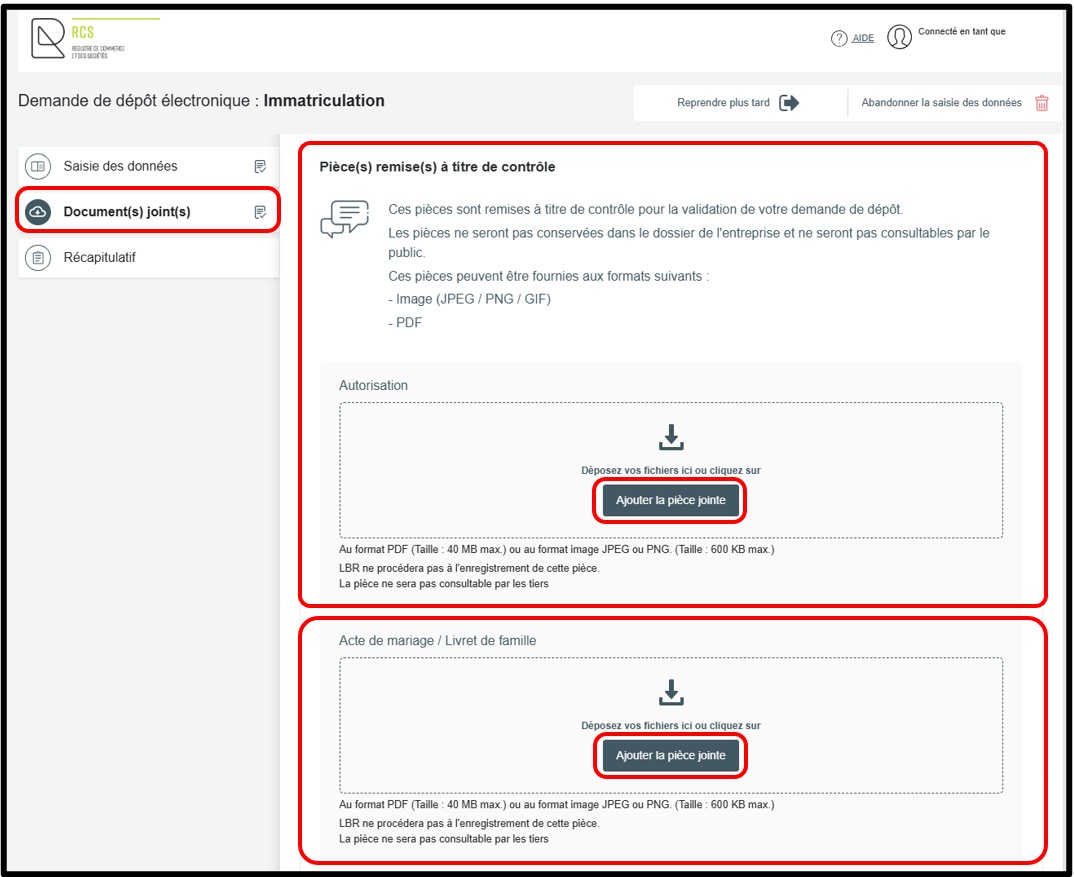
Document(s) to be attached for verification purposes
The section Document(s) joint(s) (Attached document(s)) may also, if necessary, provide the user with a list of mandatory documents to be submitted for verification purposes of the registration request.
In this case, the user is required to attach the document(s) necessary to verify their filing request in the field Pièce(s) remises à titre de contrôle (Documents submitted for verification) by clicking on the Ajouter la pièce jointe (Add attachment) button.
To continue with the filing request, the user must then click on the Vérification de la demande (Verification of the application) button.
Section "Récapitulatif"
Section of the registration application that contains a summary of the request for verification purposes by the user before it is placed in the cart.
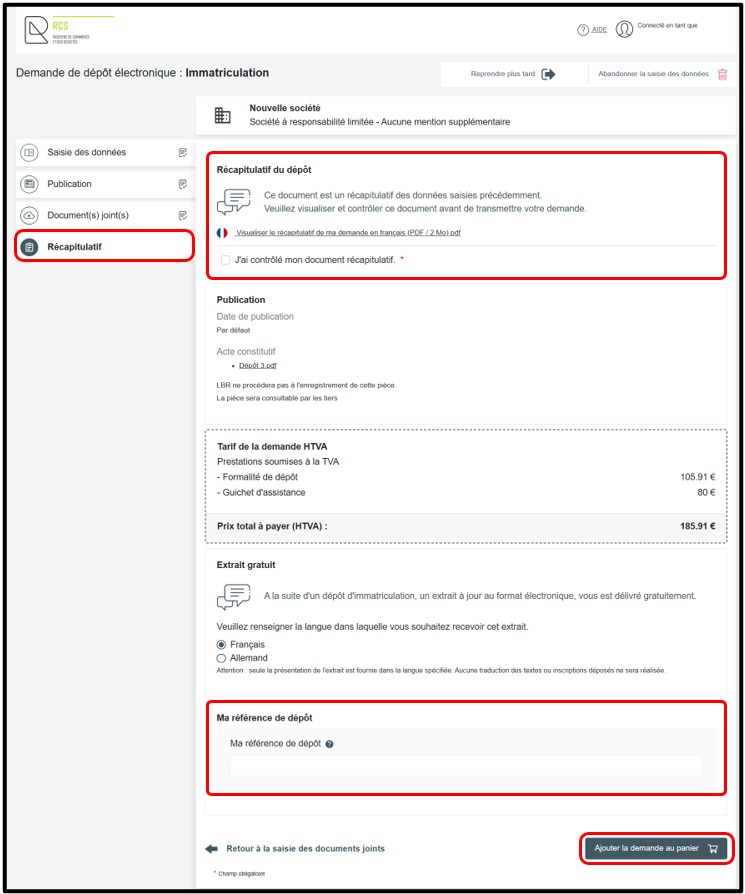
The user is invited to view the summary of their administrative request in PDF format by clicking on the link Visualiser le récapitulatif de ma demande en français (View a summary of my request in French).
In the event of an error found when verifying the summary document, the user can return to the request by clicking on the previous step until reaching the section or sub-section for which the information needs to be corrected.
If, at this stage of reviewing the summary document, the user confirms that the information entered is correct, they must check the box J’ai contrôlé mon document récapitulatif (I have verified my summary document).
The user can also indicate a filing reference in the Ma référence de dépôt (My filing reference) field, which can be defined freely, to better organize their requests.
The user then validates their request for an administrative procedure by clicking on the Ajouter la demande au panier (Add request to cart) button.